Google Search Console Step by Step: Setup, Sitemap and Indexing
Set up Google Search Console: add a domain, verify with a DNS TXT record, submit a sitemap, request indexing and read the Pages and Performance reports.
Published 7 min read

In this article
- Step 1: Choose Domain or URL-prefix property
- Step 2: Verify ownership with a DNS TXT record
- Step 3: Submit your sitemap
- Step 4: URL Inspection and Request indexing
- Step 5: Understand the Pages (indexing) report
- Step 6: Read the Performance report
- Step 7: Core Web Vitals, Manual actions and Security issues
- When your domain was used by someone else before
Google Search Console is Google's free tool that shows how your site performs in Google Search: which pages are indexed, which searches bring visitors, and what problems need fixing. To start, you add your site as a property, prove you own it (a DNS TXT record is the most complete method), then submit your sitemap and check your pages with the URL Inspection tool.
The quick version: add a Domain property, verify it with a TXT record at your DNS provider such as Cloudflare, submit sitemap.xml, inspect your key pages, then check the Pages and Performance reports every few weeks.
Step 1: Choose Domain or URL-prefix property
When you add a site, Search Console asks you to choose a property type:
| Domain property | URL-prefix property | |
|---|---|---|
| Example | example.com |
https://www.example.com/ |
| Covers | All subdomains (www, m, blog...) and both http and https |
Only URLs that start with that exact prefix |
| Verification | DNS record only | Several methods: HTML file, meta tag, Google Analytics, Google Tag Manager, or DNS |
| Best for | Most site owners: one view of the whole domain | When you can't edit DNS, or want to track one section separately |
If you control your domain's DNS, choose Domain so nothing slips through.
Step 2: Verify ownership with a DNS TXT record
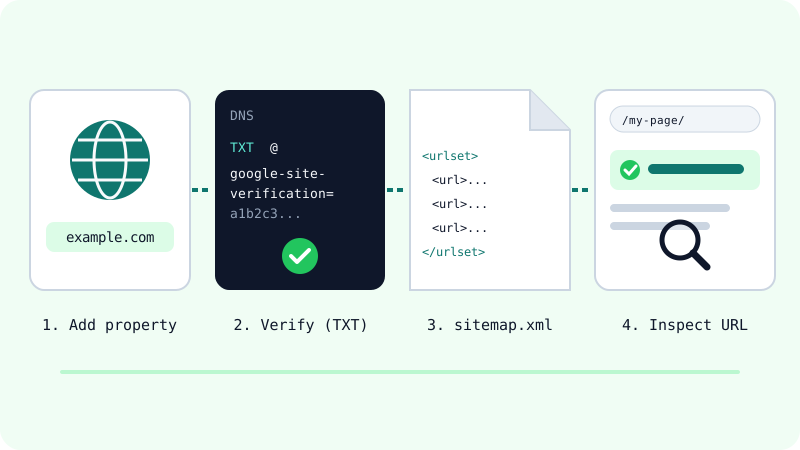
Search Console gives you a TXT record that looks like google-site-verification= followed by a unique code. You add it to your domain's DNS. If your DNS is on Cloudflare (as in our guide to connecting a domain to Cloudflare Pages):
- In Search Console, add a Domain property, type your domain without
https://orwww, and copy the TXT value it shows you. - In the Cloudflare dashboard, open your domain, then the DNS records page, and add a new record.
- Set the type to
TXT, the name to@(meaning the root domain), and paste the full verification value as the content. Save. - Go back to Search Console and click verify.
Type:    TXT
Name:    @
Content: google-site-verification=a1b2c3...
Google notes that with some DNS providers a new record can take up to two or three days to show up. If verification fails, wait and try again. If you bought your domain on Namecheap and still use its DNS, add the same TXT record there instead.
Keep the record. Removing it later can cost you verification.
Step 3: Submit your sitemap
Most site generators and CMSs create a sitemap automatically, often at /sitemap.xml or /sitemap-index.xml. Open it in your browser first to make sure it loads.
- Open the Sitemaps report from the left menu.
- Paste your sitemap URL and submit.
- Check the status. Success means Google read it without errors; Couldn't fetch often means a wrong URL or the file is blocked by
robots.txt; Has errors means Google read it but found problems.
A sitemap helps Google discover your URLs; it doesn't guarantee they will all be indexed. You can also list it in robots.txt with a Sitemap: line so other search engines find it too.
Step 4: URL Inspection and Request indexing
Paste any URL from your site into the search bar at the top of Search Console. The URL Inspection tool shows whether Google has indexed it, which canonical URL Google chose, and any problems it found. The live test checks the current version of the page, which is useful after you fix something.
If a page is new or recently updated, you can click Request indexing. Keep in mind:
- There is a daily limit on indexing requests, so use them for your important pages.
- Requesting indexing doesn't guarantee the page will be indexed.
- Requesting the same URL again and again doesn't speed anything up.
- For many URLs, rely on your sitemap instead.
Step 5: Understand the Pages (indexing) report
The Pages report splits your URLs into indexed and not indexed, with a reason for each. Having some not-indexed pages is normal: Google only aims to index canonical pages, not every URL it knows. Common reasons:
| Status | What it usually means |
|---|---|
| Not found (404) | The URL doesn't exist. Fine if you removed it on purpose. |
| Page with redirect | The URL redirects elsewhere; the target is what gets indexed. |
| Alternate page with proper canonical tag | A duplicate that correctly points to the main version. No action needed. |
| Duplicate without user-selected canonical | Google picked another URL as the main one. Add a canonical tag if you disagree. |
| URL marked 'noindex' | You (or your CMS) told Google not to index it. Check it's intentional. |
| URL blocked by robots.txt | Google wasn't allowed to crawl it. |
| Crawled - currently not indexed | Google saw it but chose not to index it for now. Improve the content and internal links. |
| Discovered - currently not indexed | Google knows the URL but hasn't crawled it yet. |
| Soft 404 | The page returns success but looks like an error or empty page. |
| Server error (5xx) | Your server failed. Fix this first. |
After fixing an issue, use Validate Fix on that reason. Google says validation typically takes up to about two weeks.
Step 6: Read the Performance report
This report shows how your site appears in Google Search. The default view covers the last three months, and the most recent data may still change.
- Clicks: how many times people clicked through to your site.
- Impressions: how many times your site appeared in results.
- CTR: clicks divided by impressions.
- Average position: the average position of your topmost result.
Switch between the Queries, Pages, Countries and Devices tabs. A practical habit: find pages with many impressions but a low CTR, then rewrite their titles and descriptions to match what searchers want. Our SEO basics guide explains how.
Step 7: Core Web Vitals, Manual actions and Security issues
Core Web Vitals
This report uses real-user data from the Chrome UX Report and groups URLs as Good, Need improvement or Poor, separately for mobile and desktop. New or low-traffic sites often see no data at all; that's expected, not an error.
Manual actions
A manual action means a Google reviewer found pages that break Google's spam policies. Most sites have none. If you get one, fix every affected page, then use Request Review and explain what was wrong and what you changed. Reviews can take days or weeks.
Security issues
This report flags hacked content, malware and social engineering such as deceptive pages. Clean the site, close the hole that let attackers in, then request a review from the same report.
When your domain was used by someone else before
If you bought a domain with history, Search Console may fill up with the previous owner's URLs showing Not found (404). Here's how to handle it:
- Don't panic. Google says 404 errors don't harm your site's indexing or ranking. When an old URL returns 404 or 410, Google drops it from its index over time.
- Make sure they really return 404 or 410, not a page that says "not found" with a success status, which shows up as a soft 404.
- Redirect only real matches. If an old URL has a genuine equivalent on your new site, use a 301 redirect. Don't send everything to your home page.
- Keep old URLs out of your sitemap and don't link to them.
- Check Manual actions and Security issues. If a problem from the previous owner is listed, clean up anything left, then request a review explaining that the domain changed hands.
- For something urgent, such as spam still showing for your domain, the Removals tool hides a URL for about six months while it returns 404 or 410. It's temporary, not a permanent fix.
You can see what Google still has indexed by searching site:yourdomain.com. Over a few weeks or months the old pages usually fade out as Google recrawls them.
Official sources: About Search Console · Verify your site ownership · Page indexing report
Frequently asked questions
Is Google Search Console free?
Yes. Search Console is a free service from Google for site owners. You only need a Google account and the ability to prove you control the site, for example by adding a DNS record.
Does verifying my site in Search Console improve my rankings?
No. Verification only gives you access to data and tools. It doesn't change how Google ranks your pages, but the reports help you find and fix problems that may be holding pages back.
Why is my new site showing no data?
New properties need time. Performance data appears once your pages start showing in search, and the Core Web Vitals report needs enough real-user data from Chrome before it can show anything. Low-traffic sites may never have enough for that report.
Will I lose verification if I delete the TXT record?
Yes. Search Console checks verification periodically, so removing the TXT record, meta tag or HTML file you used can make you lose access. Leave the record in place permanently.
Related tutorials
Websites & hosting
SEO Basics for Beginners: How to Get Your Site Found on Google
A plain-English SEO guide for beginners: how search engines crawl, index and rank pages, keyword research, on-page SEO, technical basics and helpful content.
· 6 min read

Websites & hosting
How to Build Your Own Website from Scratch with No Experience
A beginner's step-by-step guide to building your first website with HTML and CSS, testing it on your computer, and publishing it online for free.
· 5 min read
Websites & hosting
How to Connect Your Domain to Cloudflare Pages (Step by Step)
Connect a Namecheap domain to a Cloudflare Pages site: add the site to Cloudflare, switch nameservers, attach the custom domain and redirect www.
· 6 min read