How to Connect Your Domain to Cloudflare Pages (Step by Step)
Connect a Namecheap domain to a Cloudflare Pages site: add the site to Cloudflare, switch nameservers, attach the custom domain and redirect www.
Published 6 min read

In this article
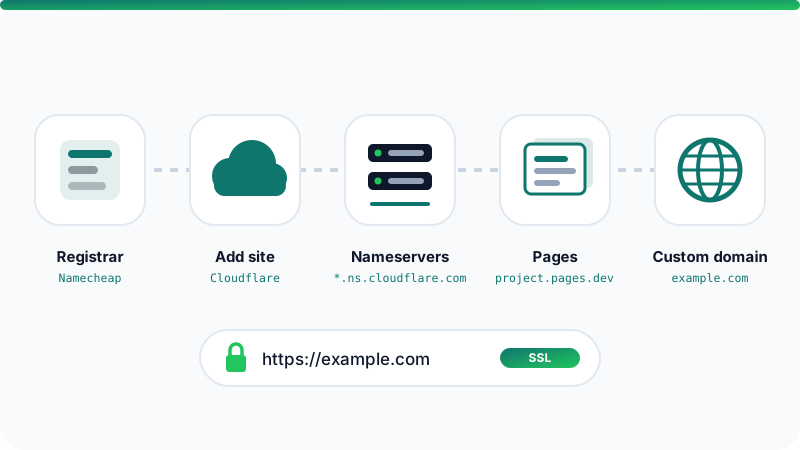
To connect a domain to a site on Cloudflare Pages, you go through three stages: add the domain to your Cloudflare account, point the domain's nameservers at your registrar (such as Namecheap) to Cloudflare, then attach the domain as a custom domain inside your Pages project. Cloudflare then issues an SSL certificate automatically and your site loads over https://.
In short: add the domain to Cloudflare on the Free plan, paste the two Cloudflare nameservers into Namecheap under Custom DNS, create a Pages project, add the domain from the project's custom domains settings, then redirect www to the root domain with a redirect rule.
What you need before you start
- A registered domain at any registrar. If you don't have one yet, follow our guide on buying a domain on Namecheap.
- A free Cloudflare account.
- A site to publish: a plain HTML folder, or a GitHub repository built with something like Astro, Vite or Hugo. New to Git? Start with Git and GitHub step by step.
- Access to your registrar's dashboard.
Cloudflare updates its dashboard regularly, so button names and menu positions may differ slightly from what you see here. The steps and their order stay the same.
Step 1: Add your domain to Cloudflare
- Log in to the Cloudflare dashboard and choose the option to add a new site or domain.
- Enter your root domain without
www, for exampleexample.com. - Pick the Free plan. It's all you need for this guide.
- Cloudflare scans your current DNS records and imports them. Review the list carefully, especially MX and TXT records if you use email on this domain.
- At the end, Cloudflare shows you two nameservers in the form
name.ns.cloudflare.com. Copy them exactly.
Each account is assigned its own nameservers, so don't copy them from a tutorial or a friend's account.
Step 2: Change the nameservers at Namecheap
- Sign in to Namecheap, open Domain List, and click Manage next to your domain.
- In the Nameservers section, choose Custom DNS from the dropdown.
- Remove any old values and paste in the two Cloudflare nameservers.
- Save with the green checkmark.
If DNSSEC is enabled at your registrar, turn it off before switching. Otherwise it can prevent Cloudflare from activating the domain. You can re-enable it later from inside Cloudflare.
The change usually takes a few minutes to a few hours. You can check it yourself with this command on Windows, macOS or Linux:
nslookup -type=ns example.com
Once Cloudflare's nameservers appear in the output, the domain's status in Cloudflare switches to Active.
Step 3: Create a Cloudflare Pages project
Go to Workers & Pages in the Cloudflare dashboard, create a new application, and choose Pages. The dashboard may put Workers first, since Cloudflare can serve static sites through Workers too, but this guide uses Pages. You have two options:
- Connect to Git: link your GitHub or GitLab account and pick a repository. Every
git pushthen deploys automatically. - Direct Upload: upload a ready-built site folder from your computer. Good for simple sites.
If you connect Git, Cloudflare asks for build settings. Common values:
| Site type | Build command | Output directory |
|---|---|---|
| Plain HTML | leave empty | the folder containing index.html |
| Astro | npm run build |
dist |
| Vite (e.g. React) | npm run build |
dist |
| Hugo | hugo |
public |
After the first successful deploy, your project gets a URL like project-name.pages.dev. Open it and make sure the site works before you attach the domain. To compare Pages with other options, see the best free website hosting.
Step 4: Attach your domain to the Pages project
- Open your Pages project and go to the Custom domains tab.
- Choose to set up a custom domain and enter
example.com. - Because the domain now lives on Cloudflare, the dashboard offers to create the DNS record for you (a CNAME pointing to your
pages.devaddress). Accept it. - Wait for the status to show Active. The SSL certificate is issued automatically, usually within minutes.
A CNAME record on a root domain may look odd, but Cloudflare supports it through CNAME flattening, so it works fine.
Always add the domain from inside the Pages project. If you create the CNAME record by hand on the DNS page without first attaching the domain to the project, you will most likely get a 522 error.
Step 5: Redirect www to the root domain
Plenty of visitors type www.example.com. Sending everyone to a single version of your site keeps Google from seeing your content under two addresses.
- On the DNS page, add a
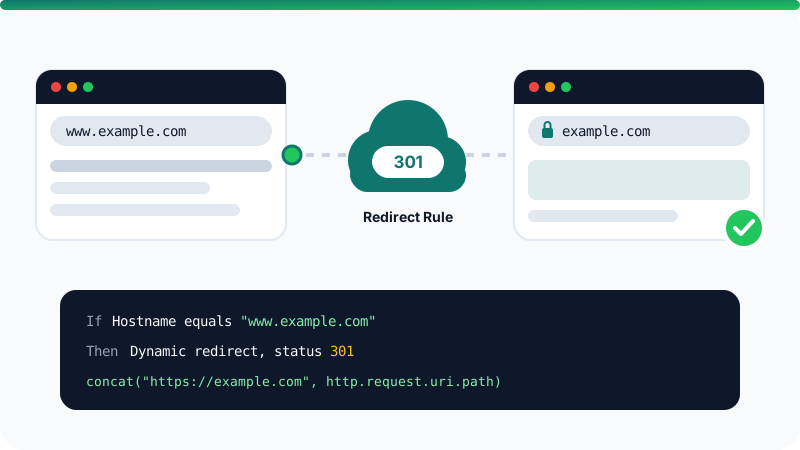
CNAMErecord namedwwwpointing toexample.com, and make sure Proxy is on (the orange cloud). Without it, requests don't pass through Cloudflare and the redirect won't run. - Open the Rules section for your domain and create a redirect rule. You may find a ready-made template for redirecting www to the root, which is the easiest route.
- If you build it yourself, set the condition to Hostname equals
www.example.com. - For the action, choose a dynamic redirect with this expression, status code 301, and preserve the query string:
concat("https://example.com", http.request.uri.path)
- Save and deploy the rule, then test it:
curl -I https://www.example.com/about
You should see 301 and a line starting with location: https://example.com/about.
Common problems and fixes
- Error 522: you probably added the CNAME manually. Delete it, then add the domain from the project's Custom domains tab.
- Domain stuck on Pending: double-check that you copied both nameservers correctly and that DNSSEC is off at the registrar.
- Security warning in the browser: the certificate can take a few minutes after activation. Wait and try again.
- Email stopped working: MX records weren't imported. Add them on the DNS page with the same values your registrar had.
- The old site still shows up: your device or network is caching old DNS answers. Try mobile data or give it a little time.
Useful next steps
- Turn on Always Use HTTPS in the SSL/TLS settings so every visitor lands on the secure version.
- Add your site to Google Search Console and submit your sitemap so Google starts indexing your pages.
- Building your first site? Read how to build a website from scratch with no experience to fill in the rest.
Frequently asked questions
Is Cloudflare Pages really free?
Yes. There is a free plan that covers most personal and small sites, including SSL and a pages.dev subdomain. The free plan has limits, such as the number of builds per month, so check the current pricing page if your site is large.
How long does it take after changing nameservers?
Usually anywhere from a few minutes to a few hours, and occasionally up to 24 hours or a little longer. Cloudflare emails you when the domain becomes active.
Will my email stop working when I move DNS to Cloudflare?
Not if your mail records, such as MX and TXT, move across correctly. Cloudflare tries to import existing records automatically, but compare them with what your registrar had before you switch nameservers.
Can I use my root domain on Pages without moving nameservers?
For an apex domain like example.com, Cloudflare Pages requires the domain's DNS to be managed by Cloudflare. Subdomains such as blog.example.com can be connected with a CNAME record at another DNS provider.
Do I still renew the domain at Namecheap?
Yes. Changing nameservers moves DNS management only, not ownership. The domain stays registered at Namecheap and you keep renewing it there.
Related tutorials

Websites & hosting
How to Build Your Own Website from Scratch with No Experience
A beginner's step-by-step guide to building your first website with HTML and CSS, testing it on your computer, and publishing it online for free.
· 5 min read

Websites & hosting
Docker for Beginners: What It Is and How to Use It Step by Step
A beginner-friendly Docker guide: what images and containers are, how to install Docker, the key commands, and how to build your first image.
· 6 min read
Websites & hosting
Best Free Website Hosting: Cloudflare Pages, GitHub Pages, Netlify and Vercel Compared
Compare the best free hosting for static sites, including GitHub Pages, Cloudflare Pages, Netlify and Vercel, and learn which one suits your project.
· 6 min read