VS Code Setup: Essential Settings and Extensions for Beginners
Set up Visual Studio Code the right way: install it, change the settings that matter, add the most useful extensions, and learn the shortcuts that save time.
Published 5 min read
In this article
- Step 1: Install VS Code from the official site
- Step 2: Learn the interface in two minutes
- Step 3: Change the settings that matter
- Step 4: Install the extensions you actually need
- Step 5: Keyboard shortcuts that save hours
- Step 6: Use the built-in terminal and Git
- Keep your setup everywhere with Settings Sync
Visual Studio Code (VS Code) is a free code editor from Microsoft that works on Windows, macOS, and Linux. To set it up well, install it from the official site, turn on a few key settings such as format on save and auto save, and add a small set of extensions for the languages you use. That takes about fifteen minutes and makes coding noticeably smoother.
In short: download VS Code from code.visualstudio.com, adjust six settings, install only the extensions you need, and learn five shortcuts.
Step 1: Install VS Code from the official site
- Go to code.visualstudio.com and download the version for your system.
- On Windows, run the installer. On the options screen, it's worth ticking the options that add an "Open with Code" entry to the right-click menu and add VS Code to your PATH, so you can open any folder from the terminal.
- On macOS, drag the app into your Applications folder. To use the
codecommand in Terminal, open the Command Palette and run the command that installscodein your PATH.
Now open a project folder instead of single files. From a terminal inside your project, type:
code .
VS Code works best when it can see the whole folder: search, Git, and the file explorer all use it.
Step 2: Learn the interface in two minutes
- Activity Bar (the far left icons): Explorer, Search, Source Control (Git), Run and Debug, and Extensions.
- Side Bar: shows the content of whichever icon you selected, such as your file tree.
- Editor: where you write code. You can split it to see two files side by side.
- Panel (bottom): the integrated terminal, problems list, and output.
- Status Bar (very bottom): current Git branch, errors, line number, and the file's language.
The most important feature is the Command Palette (Ctrl+Shift+P). Every command in VS Code can be found there by typing a few words, so you don't need to memorise menus.
Step 3: Change the settings that matter
Open settings with Ctrl+, and search for any option by name. If you prefer editing text, open the Command Palette and run Preferences: Open User Settings (JSON), then add lines like these:
{
  "editor.fontSize": 16,
  "editor.formatOnSave": true,
  "editor.wordWrap": "on",
  "editor.tabSize": 2,
  "files.autoSave": "afterDelay",
  "editor.minimap.enabled": false
}
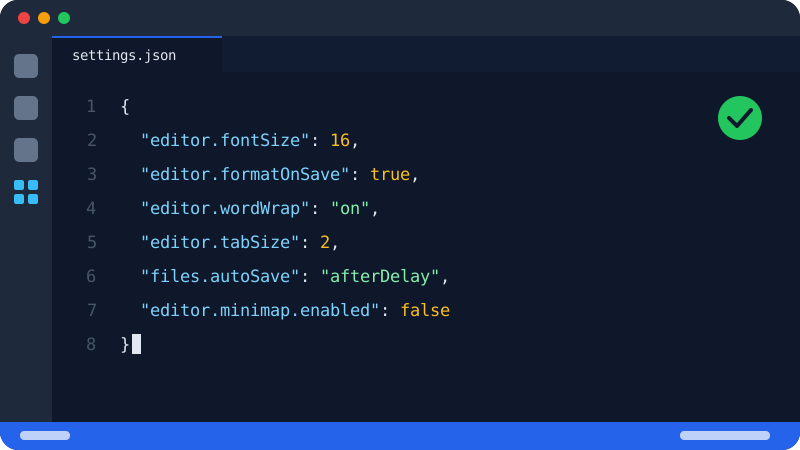
What each one does:
| Setting | What it does |
|---|---|
editor.fontSize |
Makes code easier to read. Try 15 to 18. |
editor.formatOnSave |
Tidies your code automatically every time you save. |
editor.wordWrap |
Wraps long lines so you don't scroll sideways. |
editor.tabSize |
Sets indentation width. 2 is common in web projects, 4 in Python. |
files.autoSave |
Saves files automatically after a short delay. |
editor.minimap.enabled |
Hides the code overview on the right to free up space. |
User or workspace settings? What you just changed are User settings, which apply to every project. Workspace settings are saved inside the project in .vscode/settings.json and apply only there, which is useful when a whole team should share the same rules, such as indentation size.
Also pick a comfortable colour theme: open the Command Palette and search for "Color Theme". The built-in themes are good; you don't need an extension for this.
Step 4: Install the extensions you actually need
Open the Extensions view with Ctrl+Shift+X, search by name, and click Install. Start small; you can always add more later.
For almost everyone:
- Prettier - Code formatter: formats JavaScript, TypeScript, HTML, CSS, JSON, and Markdown in a consistent style. After installing, set it as the default formatter with
"editor.defaultFormatter": "esbenp.prettier-vscode". - Error Lens: shows errors and warnings directly on the line where they happen.
- Code Spell Checker: catches typos in variable names and comments.
- GitLens: shows who changed each line and when, on top of VS Code's built-in Git support.
By language:
- Python (by Microsoft): running, debugging, and IntelliSense for Python.
- ESLint: finds problems in JavaScript and TypeScript code.
- Live Server: opens your HTML page in the browser and reloads it every time you save.
A safety tip: extensions can run code on your computer. Install only popular extensions from publishers you recognise, check the publisher name on the extension page, and remove extensions you no longer use.
Step 5: Keyboard shortcuts that save hours
These are the Windows and Linux shortcuts. On macOS, use Cmd instead of Ctrl for most of them (the terminal shortcut stays Ctrl+backtick).
| Shortcut | Action |
|---|---|
Ctrl+P |
Quickly open any file by name |
Ctrl+Shift+P |
Command Palette |
Ctrl+` |
Open or close the integrated terminal |
Ctrl+B |
Show or hide the side bar |
Ctrl+/ |
Comment or uncomment the selected lines |
Ctrl+D |
Select the next match of the current word |
Alt+Up / Alt+Down |
Move the current line up or down |
F2 |
Rename a variable or function everywhere |
You can also hold Alt and click in several places to type with multiple cursors at once.
Step 6: Use the built-in terminal and Git
Press Ctrl+` to open a terminal that starts in your project folder. You can run npm, python, or git commands without leaving the editor.
The Source Control icon in the Activity Bar lets you stage, commit, push, and pull with buttons, and shows every change with a side-by-side diff. If Git is new to you, our Git and GitHub guide explains the commands behind those buttons.
Keep your setup everywhere with Settings Sync
Turn on Settings Sync from the account icon at the bottom of the Activity Bar and sign in with GitHub or a Microsoft account. Your settings, shortcuts, and extensions will follow you to any computer.
If you work on very different projects, Profiles let you keep separate sets of extensions and settings, for example one for Python and one for web development, so each stays light.
With the editor ready, you can move on to writing real code: start with Python for beginners, or see how AI extensions and chat assistants fit into your workflow in how to use AI to help you code.
Frequently asked questions
Is VS Code the same as Visual Studio?
No. Visual Studio Code is a free, lightweight editor for Windows, macOS, and Linux that supports almost any language through extensions. Visual Studio is a separate, heavier IDE from Microsoft, mainly used for .NET and C++ development.
Is VS Code free for commercial work?
Yes. VS Code is free to download and use, including for work projects. Some extensions or connected services may have their own paid plans, so check each one.
Why is VS Code slow on my computer?
The most common cause is too many extensions. Disable the ones you don't use, or create a separate profile for each type of project. Opening a huge folder, like one that contains node_modules, can also slow down search and indexing.
How do I get my settings on a new computer?
Turn on Settings Sync and sign in with a GitHub or Microsoft account. Your settings, keyboard shortcuts, and installed extensions are then restored when you sign in on another machine.
Related tutorials
Programming
How to Use AI to Help You Code (A Practical Guide for Beginners)
Learn how to use AI assistants like ChatGPT, Claude and GitHub Copilot to write, explain and debug code, plus the mistakes to avoid when coding with AI.
· 6 min read

Programming
Which Programming Language Should You Learn First?
Python or JavaScript? Find the best first programming language for your goal, whether that's websites, data and AI, mobile apps, or games, and how to start.
· 5 min read
Programming
Frontend vs Backend: What's the Difference?
Frontend is what you see in the browser; backend is the server, logic, and database behind it. Learn the difference, the languages, and which path suits you.
· 5 min read